Wednesday, December 28, 2011

Gas Grill Regulator Can Slow Your Grill to a Crawl and Never Reach High Heat!

Low flame, low temperature, yellow flame: This has become the biggest problem with many grills these days and it's almost always because of the regulator (the funny UFO shaped thing on the gas hose). Regulators seem to be stickier these days and when they stick you don't get enough gas to generate a good grilling temperature. To get your regulator unstuck you need to release the pressure on it. Follow these steps exactly:

  1. Turn off the gas at the propane tank
  2. Disconnect the gas line from the tank
  3. Open the grill lid
  4. Turn all control valves to high
  5. Wait for about a minute
  6. Turn all control valves to off
  7. Reconnect the gas line to the tank
  8. SLOWLY turn on the gas at the tank
  9. Light the grill normally
  10. Your grill should now heat normally
  11. To keep the regulator from sticking again make sure that you turn off the control valves first, then turn off the tank valve. Always open your tank valve slowly.

If this doesn't work give it a second try. If you still have low flame then you probably have a faulty regulator that will need to be replaced.

More details here: http://bbq.about.com/od/gasgrills/a/aa081206a.htm

Tuesday, December 27, 2011

Get organized with QuickCal on the Mac


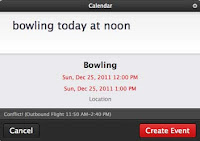
Getting organized is one of the things that I am constantly working on improving. After years of using Microsoft Office on my Mac, I finally gave up and started using iCal, Mail and Contacts, all built in and native to the operating system. The integration with iPhone is seamless and all of my information synchronizes wirelesly using iCloud. This transition has been so helpful and really improved my organization. There is one after market tool that I started using about a year ago and really love. It’s called QuickCal. I originally found out about this on the PowerPage web site. The app is an excellent add-on to iCal because you can quickly add a new calendar event without having to leave your current screen. By pressing a 3 key code, a dialog window opens. You then simply type in your event in a descriptive sentence. Take a look at this sample graphic with the green button. Notice green box in the bottom right corner that illustrates "no conflicts". However, if I have an event that does conflict, the box turns red, so I can adjust accordingly. Looks like bowling is not going to work out...


It was not until about a year later when I learned about another incredible feature of this software. The program update installed an icon on my OS menu. I was able to elect to have today’s date appear in the little box and when I click on the dropdown, I am able to see my calendar events for the next 72 hours. This is a nice feature, but even more critical is below that list. All of my reminders (which coincide with my iCal reminders and my SIRI reminders) are listed in the dropdown. I started assigning priorities to my reminder list and the top priority items are listed first.


Throughout the day, things get so hectic that I have a grouping of 3-5 tasks that are thrown on my plate all at once. Now, I just simply create new reminders, prioritze them and then tackle them one at a time. When I’m done, the QuickCal dropdown list enables me to check off the item right from the dropdown. The interactivity with this list is borderline genius, so my hat goes off to the developers. Thank you for creating a dramatically beneficial organizational tool to my workflow.

Saturday, October 29, 2011

Customized Ringtones on your iPhone: Technical Difficulty Level = MEDIUM


These notes describe an iPhone with an apple laptop. To install customized ringtones onto your iphone, follow these steps:

The 1st time only, you may need to acquire new sound editing software, unless you already have sound editing software: install soundflower, also install soundstudio:


  1. open system prefs
  2. go to sound
  3. output to Soundflower (2ch)
  4. launch sound studio
  5. choose input Soundflower (2ch) only have to do this the first time... see pic to the right for details
  6. start to record a clip on sound studio by pressing the red record button
  7. play itunes track (you should see the sounds studio sounds bars fluctuating to the beat...) and stop recording when you are done... edit the file, crop, etc.
  8. save song to desktop
  9. drag file to sound coverter http://soundconverter.en.softonic.com/mac
  10. convert to .m4r
  11. drag m4r into itunes "Ringtones" folder
  12. sync your iPhone with iTunes (you may have to quit itunes and relaunch - be sure to confirm that you see the new ringtone in the "ringtones" area. if you can't see the file, you can also try double clicking on the m4r file that you just made and it should start planing in itunes in the ringtones area.

Cold or Flu? How can you tell?

CLICK on this WebMD link below for a great breakdown comparing colds versus the flu:

http://www.webmd.com/cold-and-flu/cold-guide/flu-cold-symptoms?page=2

thanks for the tip Sara :)

Sunday, October 23, 2011

Plumbing Obsession: HydroFlush Water Saver

Update: 2/16/2014:  


Over a period of time, the flush buttons became annoying and occasionally required tightening, so I upgraded my unit by purchasing 2 items:

  • flush handle that looks more like a traditional handle with two levers for light and heavy and replaces the disc/button like device that comes with the original dual flush listed in the original story below. 


  • Once that lever arrived, it appeared that it would only work with the green cable connector, so I ended up purchasing with the...Dual-Flush Toilet Converter.  

Overall, I'm really happy with the upgrade.  The lever is easier for guests to understand and looks aesthetically more pleasing.

Original Publication Date: 10/23/2011:

I suppose my mild obsession with plumbing projects started at an early age watching my father fix minor toilet problems. As I recall one time, the toilet would not flush, so I patiently watched my dad remove the porcelain top, invert it and place it on the toilet seat. He next inspected the lever to find out if it was in fact pulling the chain, which it did. He manually grabbed the chain and gently lifted to see if the flapper, deep in the well, would lift. It did. After a few minutes of what appeared to be minor adjustments, the testing began. This is the part I remember most vividly. Dad would flush the toilet. And then he would just wait, watching the water completely recede, until that moment, in an instant, the flapper would drop like a hammer, and boom, the water would start filling up again. He would do this at least 4-5 times, each time, carefully watching all of the mechanisms that made the toilet work within the toilet engine, if you will. It's as if this was our mini-automobile, but with a lot less parts, and no chance of blowing things up. Worst case scenario, some water might drip onto the floor, but the odds of a pipe exploding were nearly zero.

Fast forward 30 years and I was running into COSTCO for a quick item (nearly impossible to do in COSTCO), when I decided to walk towards the left to pass the less frequently visited isles. Towards the back I noticed a plumbing product. It was called the HydroFlush DUAL-FLUSH and offered to save over $100 each year... something I could easily sell to my wife. So I read further and after seeing that I could completely eliminate the lever, chain and flapper, I decided to make the purchase, considering my toilet was currently using a rubber band to keep the chain at a perfect distance from the flapper. In addition, the mechanism worked by using two types of flushes, a heavy flush and a light one. Seems ingenious, but will it work?

Several weeks later, I had some free time to tackle this project, so I made my way to the bathroom and began the same ritual of removing the porcelain top. After reading the instructions on the DUAL-FLUSH, I quickly disassembled all of the necessary parts, gladly removed the lever, chain with accompanying rubber band and $3 flapper which I had purchased a year prior, and promptly proceed to install the mechanism. What I soon realized was that the floating balloon needed to remain in to tell the inflow when to stop. This was a problem because the rusty screw dowel was resting right on top of the intake valve. I had to bend the dowel with two wrenches to make this process work, which it did, but something was wrong. The water would barely flush using the “light flush” mode, and leave residual water in the bowl. Mind you, I watched several YOUTUBE videos on installing this DUAL-FLUSH before tackling the project, and it seems easy, but no one had mentioned anything about this type of problem.

I went back on YOUTUBE and found another video about a guy who had a toilet tank similar to mine in shape and size and was experiencing the same issue. To solve the problem, he adapted a vinyl tube, similar to the ones used in high school for funneling beer, cut off a several inch piece and using a hair dryer, attached the tube to the top of the intake valve so that the water could reach a higher level in the toilet. Apparently a full 2” of water was required ABOVE the blue gauge on the DUAL-FLUSH mechanism.

At this point I realized that I was not going to be able to finish the project on that day. Fast forward another couple weeks. I stopped at Lowe’s and purchase a Fluidmaster to get rid of the ballcock contraption which was leaving rusted bits on the floor of my tank. I also purchased the tubing.

A week or two later, the time had come to finish this project once and for all. I used the same hair drying method to melt the vinyl, which worked like a charm. I also used a zip tie to be extra sure the seal was tight since I was not using any glue, assuming the melted vinyl would suffice, which it did. After installing the the necessary parts, everything seemed to work. I left the tank cover off for a few days, just to watch the water ebb and flow.

So now it seems to be working, but I wanted to know for sure if this is actually working. I measured the amount of cubic volume of water being used on my other toilet which houses the older mechanism and compared it with the DUAL-FLUSH. On “light” flushes, I use 50% less water and on heavy flushes, about 4% less. Pretty cool!

Tuesday, September 27, 2011

HealthTap

HealthTap Express Puts a Doctor on Your Smartphone, Ready to Answer Questions
http://lifehacker.com/5844191/

Back in 2008, I put a note in my computer to come up with a Web site to provide a Q&A exchange with doctors on basic questions about health... looks like HealthTap beat me to it and they did a great job! I asked a question a half hour ago and it was already answered by two doctors! Here is my question with answers below:

How long can I use the same water bottle before washing or acumulating harmful bacteria?

4086_teeny
Ryan Sep 27, 2011 Report

Dr. Robert Kwok answered:

Wash it twice a week

A healthy person using a water bottle to carry clean drinking water is unlikely to get an illness from "harmful" bacteria in the bottle. Neither the water nor the bottle are sterile, so there will be some bacteria, but probably won't cause disease. Rinsing the bottle with a little drinking water at each refill will help keep the bottle clean. Actual cleaning of the bottle can be done twice a week.

2 minutes ago

Dr. David Finke answered:

Less than a week1st answer

First, make sure the bottle is BPA free and avoid reusing commercial one-time use water bottles over and over. Keep the water bottle out of hot environments and rinse it frequently. I wash mine with soap and water every 2-3 days.

Thursday, September 8, 2011

DampRid to the Rescue: Cell Phone + Water = Disaster


I must share this embarrasing moment with the world so that others might have the same luck as I have recently had after DROPPING MY CELL PHONE IN THE TOILET while it was flushing! (My phone is pretty outdated and slow and I was planning on getting a new one.)

Fortunately, 80% of the water had flushed, so it was only submersed for about 2 seconds. As soon as I grabbed the phone, I immediately POWERED IT OFF, just as I had recalled reading in the incredibly useful Apple Core Blog at ZDNet by Jason O'Grady in his article HERE: How to survive an iPhone liquid submersion (hint: it's not rice). The blog gives step by step instructions on how to increase your odds of success.

Unfortunately, I had to run to a meeting and did not have time to go to Lowes, so I did in fact put my phone in an airtight lock-n-lock container with about a cup if rice. Three hours later, I went to Home Depot, (in the pouring rain no less) and purchased 1 box of DampRid that comes in 2 "Sachet" bags. I followed The Apple Core steps, sandwhiched the phone and kept it sealed in a ziplock bag for about 30 hours.

I nervously turned on the phone, and noticed a faint charge symbol illuninated on the screen - almost as if the screen was broken at 10% brightness, so I plugged it in. Five minutes later, my phone came back from the dead with the sound of 40 texts and no voice message notifications*!

*One thing that really saved me was being able to forward my phone to Google Voice. I called ATT at 11 PM that evening and spoke to their after hours tech support crew. They were able to forward my phone to my designated Google Voice number. The great thing about Google Voice is that any messages are transcribed to text. Very helpful. I was going to forward all calls to a new Skype number, but that was $18/3 months, so I held off on that option.


Tuesday, August 30, 2011

NEXT DIY: Undermount Microwave

After about three years of use, the GE (piece of crap) Spacemaker XL1800 started falling apart. First the door handle ripped off, then the door itself started cracking apart. I called GE to find out the replacement part costs and decided to hold off and just replace the entire unit. Forward two years and three mighty putty applications later...


I decided to run over to the "new" Sears warehouse in East Norriton to see if they had any good deals, but their supply of black undermount microwaves were limited and upwards of $350. Plan B: I re-activated my Consumer Reports account online for a one month subscription of $5.95 and found the number one microwave in its class: SMH9187B. I searched around and I found it online for $279. One appliance store was charging $99 for shipping. Then I found one at Lowes on Columbus Blvd, but they only had one in stock and it was the floor model. I talked my wife into driving down with me to check it out. Turns out it was in great condition, and the agent who helped me took $70 off for the floor model!!

During the drive home I memorized the instructions manual. The total swap took about 45 minutes, but mostly because the old and new microwave were indentical in size so we were able to use the existing wall mount bracket. Huge time saver.

STEP 1:

Remove power from old microwave.

STEP 2:

Detach the duct tape from the vent.

STEP 3:

Place support underneath the microwave so that it wont fall when removing the securing bolts from the top. In this case, I stacked some coolers and a book.


STEP 6:

Remove the three bolts from the top.


STEP 7:

Tilt the face of the unit down, then lift off of the wall mount support lip.


STEP 8:

Replace the new microwave... Having two people definitely helps make it easier.


STEP 9:

Make sure the duct is retaped securely, then plug in, power up and test!

Sunday, August 21, 2011

Dimmer Switch: Check

After years of thinking about doing some type of minor home electrical project and never having the nerve to try something for fear of burning the house down, I finally bit the bullet with a dimmer light switch and it worked on the first try!

STEP ONE:

Turn off the power at the electrical panel for the specific area.

STEP TWO:

Remove the face plate.


STEP THREE:

Remove the screw securing the existing switches to the outlet box, the pull them out so that you can see the wires and screw caps with clarity.


STEP FOUR:

For a novice like me, using an electric tester could be the difference between success and singeing the hair off of your arms.


STEP FIVE:

Read the instructions on the dimmer packet carefully. I learned from the instructions that we have a single pole dimmer and not a 3 way. You can also find good instructions Here.

STEP SIX:

While removing the wires from the existing switch, I noticed that one of the black shielded wires had been exposed for a connection that was no longer needed so I wrapped the exposed area with electrical tape.


STEP SEVEN:

Test by turning the switch at the panel ON.

STEP EIGHT:

Replace all of the parts, and if your not a rookie (like me), you will make sure that the dimmer slides down for off and up for high. I might fix that later if if bothers me, but for now, everything works and there is no strange burning smell so I'm psyched. That was pretty easy!


Tuesday, August 2, 2011

BMW i3 Electric City-Car Concept


http://www.caranddriver.com/news/car/11q3/bmw_i3_concept-official_photos_and_info


Sunday, July 10, 2011

Replacing a kitchen faucet = medium difficulty

After viewing a few youtube videos on swappng out a faucet, I decided to take a shot on this plumbing project. Fortunately, this story has a haping ending, but not without a trip to Lowes, a metal shard almost stuck in my eye, and a few creative solutions.

STEP 1: turn off the water valves under the sink.


STEP 2: remove the existing hardware. This part could have been easier, but I was unable to disconnect the final nut securing the faucet to the countertop. Here is a picture from underneath the sink looking up at the underside of the cabinet:


While I was trying to loosen the nut, shards of metal were dropping down on my face. I decided to put on protective goggles, and went into the bathroom to flush my eye with water. Still unable to get this nut loose with my adjustable wrench, I decided to go to Lowes to purchase a plumbers wrench which did the trick... albeit a little challenging.


STEP 3: Insert new hardware

I purchased a new gasket to act as a washer between the faucet and the countertop. Not sure if this was the correct product, but it seems to work well so far and the old one completely disintegrated.


I also had to insert a spacer underneath the countertop for the faucet to sit plumb and needed to remove the old copper tubing completely and connect the hot and cold tubes to the water valves. Using plumbers tape helped and a lucky guess led me to securing hot to hot and cold to cold on the first try.

STEP 4: Test


Success!

Total work time: 75 minutes (not including trip to Lowes). Difficulty level: 3 out of five.


Sunday, May 29, 2011

Plumbing Part II

Ok, so I spoke too soon. As you may have read in my previous post "Duff Plumbing in Norristown..." I thought I had fixed the slow leak problem that the toilette was exhibiting. Every 5 minutes or so, the toilette would start to refill for abut 10 seconds, then stop. This "slow leak" was diagnosed by Duff's Plumbing, and suggested resolution was to swap out the flapper.

The flapper fixed the problem for a short while, but ultimately the slow leak resurfaced. I went back to Duff's to readdress. The guy at the counter suggested that it may not be a flapper problem at all. Instead, he suggested that the problem might be a siphoning issue. Pretty cool, right? Well this time, he was spot on.

If you notice in the picture below, there is a black tube that extends from the flushmaster down into the white overflow pipe?


This tube cannot be too long. If it extends too far down the overflow pipe (white pipe pictured), then siphoning can occur.


I used a household scissors and clipped the tube and now finally the problem is officially corrected.

YouTube Video


Monday, May 16, 2011

Dropxox Security Questioned by FTC

Dropbox Lied About Data Security, Complaint to FTC Alleges: Dropbox made false claims to users about its encrypt... http://bit.ly/lrdeYJ


Wednesday, May 11, 2011

Duff Plumbing in Norristown Does It Again

Our bathroom toilette started making a water noise as if it was filling up the tank for about 10 seconds, then stop, then wait for three minutes and start over again. I took a picture of the tank...


... and went to my favorite pluming supply store, Duff Plumbing, 201 East, Lafayette Street, Norristown PA 19401, 610-275-4453 http://www.duffcompany.com/ and showed the guy my pic. He told me that it sounds like the toilette is leaking water and the first step would be to replace the flapper. He told me to run my finger along the rim to make sure there is no gunk or residue.


Three dollars later, I replaced the flapper and the problem is solved. This took about 2 minutes to fix. Thanks Duff.


Location:201 East Lafayette Street, Norristown PA 19401

Sunday, May 8, 2011

Deck pad works great for staining the deck

Anticipating three sunny days in a row, I decided to bite the bullet and finish the deck staining project that began last november. Good thing I called Mom to wish her a happy Mother's Day because she had a great suggestion, to use a Shure Line deck pad at Lowe's. It was able to get in between the spindles and it was easy to use. I did notice that the pad would start to slip off so I found a way to hold the pad with my finger inserted in the center to keep it in place.


I also figured out a way to secure the paint tray to the ladder so that I wouldn't have to continually go on and off the ladder to add paint to the pad by using a 1 foot segment of closet shelving zip tied to the ladder. It actually worked out great.


I'm not sure if all extension ladders are position the same but when I zip tied the shelving to the ladder, it rested in such a way that it had a slight slope which helped keep the stain towards to bottom.

YouTube Video


Old fashioned ingenuity meets modern day technology

I was planning on spending the afternoon staining the deck and really wanted to use my iPod, but the headphone jack has messed up ever since the headphones got ripped out of the jack one too many times. Whenever I put the iPod in my pocket, every move I made would adjust the headphone jack just slightly enough to make a loud static noise in my ear - really annoying. So I decided to take matters into my own hands (inspired by the NPR segment on going to your grandpa to fix whatever was broken) and tried using my favorite tool, the rubber band, to secure the jack from moving. I attached the rubber band, put the ipod on my pocket, and low and behold, my music worked static free for hours.


Saturday, May 7, 2011

SATA HD Enclosure a Snap

After replacing my 2.5" Sata HD with an unbelievably awesome OWC SSD (which has changed my life for the better - so go get your upgrade), I was left with an exposed drive in need of an enclosure. I searched Amazon, and found the Acomdata HDEXXUP-240-BLK SATA enclosure for $12.99 with decent reviews and free shipping.


Installation was a snap, but the USB self powered device required being plugged directly into the machine or to a powered USB hub. Non powered USB hub didn't provide enough juice to make this HD spin. Overall satisfied and it's a very portable inexpensive solution. I would give it a 4 out of 5. Don't forget to strap on your static band.


Location:Norristown PA

Saturday, April 30, 2011

Installing an SSD on your mac couldn't be easier, but the results are even more impressive

If you are obsessed with getting the maximum value out of your computer and want better performance without the expense of new machine, first make sure you are maxed out on RAM, then upgrade to a solid state harddrive (SSD). Solid state implies that there are no moving parts, so instead of your regular hard disk spinning to access information, SSDs go right to the source. I have noticed Microsoft products to be about 4-5 times faster on launch and quit. My machine starts and shuts down about 3-4 times as fast. Overall performance is great and I would highly recommend this upgrade path before buying a new machine.


Location:Penn Crossing Dr,Norristown,United States

Sunday, April 24, 2011

Plugging in your flat screen

Did you ever try to hook your laptop up to a flat screen tv, but couldn't see the input jacks because the tv was on a fixed wall mount?

I ran into this problem the other week and found a solution. Take your camera phone or iPad, slide it behind the tv, shine a flashlight and take a picture so that you can see exactly where to plug in.

This works extremely well with front facing camera on an iPad. You can see the jacks when taking the photo...


PVC Plumbing Proves Amateur Capable Clog Cleanup a Breeze

The first time I had to take apart the PVC plumbing underneath my bathroom sink was several years ago when my wife (then fiancé) had accidentally dropped her engagement ring down the sink when washing her hands. In five minutes, I was able to remove the u shaped PVC tube by hand to free her ring.

This time around, after 4 years of regular usage, the sink started clogging. After a few weeks the clog had turned into a full blown stoppage. I setup a bucket and turned off the water. I removed all 4 parts of PVC by hand then used an old toothbrush to wipe clean all pieces.

This was a very easy project and I would encourage you to do the same when the time comes.


Friday, April 15, 2011

How to get a refund of your iPhone or iPad Apps

http://cnettv.cnet.com/refunds-iphone-ipad-apps/9742-1_53-50087858.html

Wednesday, April 13, 2011

Shock Wave Rotor: Modern adaptation of the Combustion Engine Leads to 3.5x Greater Efficiency

http://news.discovery.com/tech/new-car-engine-sends-shockwaves-through-auto-industry-110405.html


"central inlets are blocked off, building pressure within the chamber, causing a shock wave that ignites the compressed air and fuel to transmit energy"

"the generator is 3.5 times more fuel efficient than typical combustion engines"


Wednesday, January 12, 2011

Snow shoveling: U.S. hospitals treat on average about 11,500 injuries and medical emergencies a year related to shoveling snow

Snow shoveling: U.S. hospitals treat on average about 11,500 injuries and medical emergencies a year related to shoveling snow, according to a study in the American Journal of Emergency Medicine that analyzed data from 100 emergency departments from 1990 to 2006.

RESREPORT
Reuters

A worker shoveled snow after the late December blizzard in New York. The study, the first national survey of snow-shoveling injuries, said the activity places extraordinary demands on the cardiovascular system and can raise heart rates above recommended upper limits after only two minutes. Freezing temperatures also constrict peripheral blood vessels, further stressing the heart. Two-thirds of shoveling injuries occurred in men, and 15% of injuries were in children under 18 years old. More than half of injuries resulted from acute musculoskeletal exertion, 20% from slips and falls, and nearly 7% from cardiac problems, such as heart attack.

The study said most shovels contribute to injuries because of their non-ergonomic design, which hasn't changed in over a century. Researchers recommend shovelers under 18 be supervised, people should warm up with light exercise before shoveling and sedentary individuals should consider hiring someone for the task.

Caveat: Researchers said their findings underestimate the number of injuries and medical emergencies associated with snow shoveling because only cases treated in emergency departments were included.

Title: Snow shovel-related injuries and medical emergencies treated in US EDs, 1990 to 2006.

Monday, January 10, 2011

Save Your Soap!

What do you do with your bar of soap remnant once it's worn down to a shadow of it's original self?
Do you throw yours away? Collect them? Give them to Ted Williams?

I have come up with a solution to save your soap remnants, adding at least a weeks worth of use on an annual basis, possibly more.

Step 1: Grab a new bar of soap, bring it in the shower

Step 2: Use your old soap remnant (I like to do this when it's still one piece if possible)

Step 3: Notice that the old soap is now pliable after using it

Step 4: Squeeze the old soap onto the new bar of soap with two hands (I interlock my fingers together and clamp with my palms as hard as possible)

Step 5: put the soap on it's tray and let stand/dry until the next usage


Congratulations, you have now successfully fused your old soap with the new soap!